When you’re putting up a new fence in Braintree, getting the foundations right is everything. The local clay soil can be unforgiving, and many people find themselves asking the same questions: How much post-crete do I actually need? Am I using the right amount of water? And will my timber posts just rot away in a few years? These are valid concerns, and using a quality post crete incorrectly can lead to a weak fence that won’t stand the test of time.
As your local, independent timber merchant, we see these projects through from start to finish. In this straightforward 2026 guide, we’ll cut through the confusion. We’ll provide a clear, step-by-step process for preparing, mixing, and setting your posts for a rock-solid finish. You’ll learn the professional techniques to ensure your fence is durable, secure, and perfectly suited to our Essex ground conditions, giving you the confidence to get the job done right, and right fast.
Key Takeaways
- The long-term stability of your fence depends entirely on correct hole preparation. Learn the essential depth calculation for Braintree’s challenging clay soil.
- Understand the correct water-to-mix ratio for post crete to achieve a rapid, rock-solid set in under 10 minutes.
- Avoid the single most common DIY mistake that leads to weak, wobbly posts and a poor finish.
- Follow a clear, step-by-step process to set your fence posts securely, ensuring they withstand the Essex weather for years to come.
What is Post-Crete and Why Is It Ideal for Essex Fencing Projects?
When erecting a fence, the foundation is everything. A secure footing ensures your fence panels withstand high winds and remain straight for years to come. For both trade professionals and DIY enthusiasts, post crete is the go-to solution for achieving this stability with maximum efficiency. In simple terms, it’s a pre-blended, rapid-setting concrete mix, supplied in a bag, that requires only the addition of water to activate.
Its primary advantage is speed. Unlike traditional concrete that can take hours or even days to cure, post-crete sets hard in just 5-10 minutes. This allows you to set multiple posts and move on with your project the very same day. Here in Essex, our heavy clay soil can be particularly challenging, expanding when wet and shrinking when dry. A fast-grabbing, solid foundation is essential to prevent posts from leaning over time, and this is where a quality post mix truly proves its worth. While understanding the definition and purpose of a fence is the first step, ensuring it’s built on a solid base is the practical challenge we help you solve.
Post-Crete vs. Traditional Concrete: A Quick Comparison
While both materials serve to create a solid footing, they are designed for different applications and priorities. Here’s a straightforward breakdown:
- Speed: Post-crete achieves an initial set in minutes, allowing for same-day work. Traditional concrete requires at least 24-48 hours before it can bear any significant load.
- Convenience: With a post mix, there’s no need for a cement mixer or calculating ratios of cement, sand, and aggregate. Simply pour the dry mix into the hole around the post and add water.
- Strength: Traditional concrete, when mixed correctly, offers superior compressive strength, making it essential for structural foundations like shed bases or footings. Post-crete is formulated specifically for securing posts and is not suitable for load-bearing structural work.
- Cost: Per bag, post-crete is more expensive than the individual components of traditional concrete. However, it saves significant time and labour costs, often making it the more economical choice for fencing projects.
Common Uses for Post-Crete in Braintree Gardens
The primary and most obvious application is for setting fence posts, whether they are timber, concrete, or metal. Its rapid-setting nature ensures your post is held perfectly plumb while it cures. If you’re looking for inspiration on different styles of fences and materials, you can check out Pauresta for some ideas. However, its utility extends beyond fencing. We regularly supply it for other garden projects across Braintree and the surrounding areas, including:
- Securing rotary washing lines
- Installing garden signs or small bird tables
- Setting small gate posts for garden paths
- Anchoring garden archways or pergolas
The key is to use it for non-structural applications where speed and convenience are the main priorities.
Step 1: Preparing Your Post and Hole for Braintree’s Ground Conditions
Getting the groundwork right is the most critical stage of setting a fence post. A poorly prepared hole or the wrong type of post will undermine the entire project, no matter how well you mix your post crete later. Before you start, ensure you have the right tools to hand: a post-hole digger or a sturdy spade, a rabbiting spade, a tape measure, and a spirit level. A rabbiting spade, with its narrow blade, is particularly useful for cleaning out the hole and ensuring straight sides.
As a reliable rule of thumb, the hole’s depth should be one-third of the post’s planned height above ground. For a standard 1.8m (6ft) fence, this means digging down at least 600mm (2ft). The width should be three times the width of the post-so for a 100mm post, you need a 300mm wide hole. A hole that’s too narrow won’t allow enough post crete to form a strong collar, while one that’s too wide wastes material. Getting these dimensions right is the first step in calculating how much concrete you’ll need for a solid, lasting job.
Digging the Perfect Post Hole in Clay Soil
Here in Braintree and across Essex, you’re likely to be digging into dense clay. It’s hard work, but the good news is that clay holds its shape well, giving you a clean hole to work with. Focus on digging a hole with straight, vertical sides and a flat, compacted base, removing any large stones or roots as you go; for more significant obstructions, you may need to explore Tree Removal. Once dug, add a 50mm (2-inch) layer of gravel or broken stone at the bottom. This drainage layer is vital; it allows water to drain away from the end grain of the timber, significantly reducing the risk of rot.
This kind of demanding physical labour is a workout in itself. Ensuring you have the core strength to tackle such projects safely can make all the difference. For those interested in efficient, full-body conditioning, studios such as Bodytec Lemmer utilize advanced EMS technology to build functional strength, which is a great example of modern fitness approaches.
Selecting and Preparing Your Timber Posts
Using the correct timber is non-negotiable for a long-lasting fence. Always choose pressure-treated posts with a UC4 (Use Class 4) rating. This specification means the timber is treated for permanent in-ground contact. This isn’t just a surface treatment; preservatives are forced deep into the wood’s structure under high pressure, providing robust protection against rot and insect attack from the inside out. For maximum durability, we supply a comprehensive range of C24 treated structural timber ideal for the job. Before placing your post, give it a final check for straightness-a warped post will compromise the entire fence line.

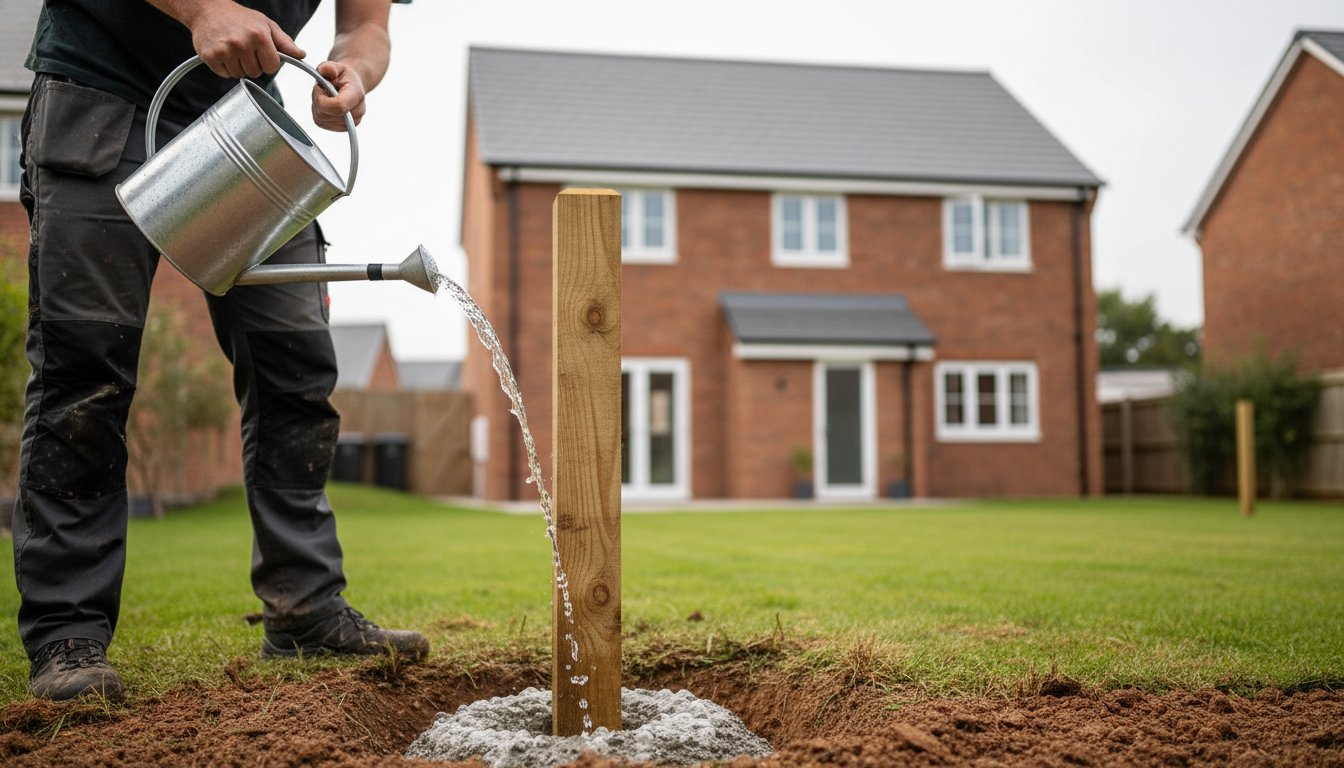
Step 2: How to Mix and Pour Post-Crete Correctly
With your hole prepared, the next stage requires speed and precision. Fast-setting concrete products begin to harden within minutes, so it is essential to have your fence post, spirit level, water, and the mix itself within arm’s reach before you start. For most standard fence installations using 75mm to 100mm posts, one 20kg bag of post crete is sufficient per hole. Always check the manufacturer’s instructions, but work on the principle of being fully prepared before you cut the bag open.
The ‘Just Add Water’ Method
The primary benefit of post-fix concrete is its simplicity. There is no need for a cement mixer or pre-mixing in a wheelbarrow, saving considerable time and effort on site. Follow these steps for a secure and professional result:
- Step 1: Position the Post. Place your timber post into the centre of the hole. Use offcuts of timber or specialist post supports to brace it on at least two sides, ensuring it remains perfectly vertical while you work.
- Step 2: Add Water First. Refer to the instructions on the bag for the recommended volume of clean water and pour it directly into the hole. It is better to add slightly less than the maximum recommended amount, as you can add a little more if needed.
- Step 3: Pour the Dry Mix. Carefully open the bag and pour the dry powder evenly into the water, distributing it all around the base of the post until it is just above ground level. The mix will begin to react immediately.
- Step 4: Check the Level. As soon as the powder is in, use your spirit level on two adjacent sides of the post to confirm it is plumb. You have only a minute or two to make final, minor adjustments before the mix stiffens.
Final Checks and Setting Time
The chemical reaction is rapid. The mix will become unworkable within 1-2 minutes and achieve an initial, hard set in 5-10 minutes. To ensure a solid, durable foundation, gently tamp the surface of the wet concrete to work out any trapped air pockets. For maximum longevity and to prevent rot at the post base, it is best practice to shape the top surface, creating a slight slope that directs rainwater away from the timber. This approach aligns with professional installation guidelines, such as those found in UK government fencing standards, which prioritise durability.
Crucially, do not disturb the post or attempt to attach any fence panels for at least 30-40 minutes while the post crete cures. For heavier structures like gates, we recommend waiting several hours to ensure maximum strength.
Avoiding Common Mistakes: Tips for a Flawless Finish
Using post-crete is straightforward, but a few common errors can compromise the strength and longevity of your fence. Getting the fundamentals right-from hole preparation to mixing-is the difference between a fence that lasts for years and one that fails prematurely. We see the same questions time and again, so here’s our no-nonsense guide to getting it right first time.
Water Ratio: The Most Common Pitfall
The number one mistake is using the incorrect amount of water. It might seem like a small detail, but the water-to-cement ratio is critical for the chemical reaction that gives concrete its strength. Get it wrong, and the entire post installation is compromised.
- Too little water: The mix won’t activate or hydrate fully. This results in a dry, crumbly, and weak concrete base that will not properly support the post.
- Too much water: A soupy mix creates a porous, weakened concrete once cured. It will also take significantly longer to set, leaving your post vulnerable to movement.
Always follow the manufacturer’s instructions printed on the bag. For those working in the dry summer conditions we often see across Essex, we recommend lightly dampening the inside of the hole with a hose before adding the dry mix and water. This prevents the dry ground from drawing moisture out of the mix too quickly.
How Much Post-Crete Do I Need? A Calculation Guide
Running out of mix halfway through a job is a frustrating and avoidable problem. Calculating your needs beforehand ensures a smooth, efficient workflow. While exact requirements vary based on ground conditions and post size, a reliable estimate is simple to work out.
A practical example: For a standard 100mm x 100mm (4×4 inch) timber post set in a hole measuring 300mm (12 inches) wide and 600mm (24 inches) deep, you will typically require two 20kg bags of post crete per hole.
Our advice is always to buy one more bag than you think you’ll need. It’s far better to have a bag left over for another project than to have to stop work to fetch more supplies. If you’re planning a large fencing project and need to confirm exact quantities, our experienced team is here to help.
Need a hand with your calculations? The team at our Braintree trade counter can help you work out the precise amount of post-mix and aggregates for your job.
Get All Your Fencing Supplies in Braintree
Once you have a plan for your project, the next step is sourcing high-quality materials. For any fencing job in the Braintree area, Essex Board & Timber is your local, one-stop-shop. We provide everything you need to build a durable, long-lasting fence, from the foundational post crete to the final decorative post cap. Our extensive stock means you can get everything required in a single trip, saving you time and ensuring you have the right components for the job.
Our expert team is always on hand at our trade counter to offer practical, no-nonsense advice. Whether you’re a seasoned professional or tackling your first DIY fencing project, we can help you calculate quantities and select the best materials for your specific requirements.
Your Local Braintree Fencing Checklist
To ensure your project runs smoothly, it pays to have all your materials ready. We stock a comprehensive range of fencing supplies, all sourced for their quality and durability. Getting everything from one reliable, local supplier means no delays and no compromises. Your essential checklist includes:
- Post-Crete: We stock fast-setting, reliable post mix from trusted brands.
- UC4 Treated Fence Posts: Choose from timber or concrete posts, all treated for a 15-year desired service life and direct contact with the ground.
- Gravel Boards: Essential for protecting the base of your fence panels from ground moisture. Available in timber and concrete.
- Fence Panels: A wide selection of styles, from traditional closeboard to decorative panels.
- Fixings and Tools: All the necessary screws, nails and bolts, brackets, and tools to complete the installation.
- Post Caps: To provide a professional finish and protect the end grain of your timber posts.
Why Choose Essex Board & Timber?
As a leading independent timber merchant in Essex, we pride ourselves on offering a level of service and expertise that larger national chains can’t match. We understand the specific demands of the local environment, sourcing robust materials that are built to stand up to the Essex weather. Our focus is on quality products that provide lasting value.
We support our customers with a range of practical services, including a bespoke cutting service to get your timber to the exact size you need, and a reliable local delivery service across Braintree and the surrounding areas. When you need dependable materials and straightforward, expert advice, we are here to help.
Visit us in Braintree or call today for a quote on your fencing materials.
Your Braintree Fencing Project: Built to Last
Building a sturdy, long-lasting fence in Braintree comes down to two key factors: using the correct technique and sourcing quality materials. As this guide has shown, mastering the preparation, mixing, and pouring of post crete is fundamental to setting a solid foundation. Avoiding those simple, common mistakes ensures your fence posts are secure from day one, ready to face whatever the Essex climate throws at them.
A secure fence is an excellent deterrent and a key part of your home’s overall security plan. For other aspects of home protection, like ensuring your doors and windows are properly secured, it can be helpful to explore Locksmith services for professional advice and assistance.
At Essex Board & Timber, we provide everything you need to get the job done right. As a proudly independent, Braintree-based timber merchant, we offer straightforward, expert advice to both trade and DIY customers. From fence panels and posts to all your aggregates, we have the stock on-site, backed by a reliable local delivery service across Essex. If you’re ready to start your project with the best materials and support, our team is here to help.
Take the next step towards a flawless finish. Get a quote for your fencing project from our Braintree team today.
Frequently Asked Questions About Post-Crete
How many bags of post-crete do I need for one fence post?
For a standard 75mm or 100mm square fence post, you will typically need one to two 20kg bags. This assumes a hole that is roughly three times the width of the post. For larger posts, such as those used for gates, or for posts set in loose ground, you may require more. We recommend having 1.5 bags per post on hand to ensure you don’t run short during the job. Always check the manufacturer’s guidelines for precise quantities.
How long does post-crete take to fully cure and become strong?
Post-mix sets remarkably fast, usually becoming firm enough to hold a post unsupported within 5 to 10 minutes. This allows you to work efficiently along a fence line. However, for full structural strength, it needs more time. We advise leaving the posts for at least 24 hours before attaching heavy panels or gates. For a complete cure and maximum durability, allow up to 72 hours, particularly in cold or damp weather conditions.
Is post-crete as strong as regular concrete?
While post-mix provides more than enough strength for securing fence posts, it is not formulated to have the same high compressive strength as traditional concrete. Its primary advantages are speed and convenience. For heavy, load-bearing structural work like foundations or slabs, you must use a proper concrete mix. For its intended purpose of setting posts, its strength is perfectly adequate and reliable for a long-lasting fence.
Can you use post-crete in the rain?
It is best to avoid using post-mix in heavy rain. Excess water can upset the water-to-cement ratio, resulting in a weaker final set that may compromise the post’s stability. If you must work in a light shower, keep the bags dry and try to shield the hole from collecting too much water. The goal is to control the amount of water that activates the mix; uncontrolled flooding of the hole will produce a poor result.
Should a wooden fence post touch the bottom of the hole?
No, a wooden post should not rest directly on the soil at the bottom of the hole. It is crucial to first add a 50-75mm layer of aggregate, such as gravel or small stones. This base allows water to drain away from the end grain of the timber, which is the most vulnerable area for moisture absorption and rot. This simple step is vital for maximising the lifespan of your fence posts, even when using pressure-treated timber.
What is the price difference between post-crete and mixing my own concrete?
A 20kg bag of post-mix generally costs between £5 and £8 and offers exceptional convenience. Mixing your own concrete from separate cement, sand, and aggregate is more economical for materials, potentially saving 30-50% on a large project. However, this saving comes at the cost of your time and labour. For a small number of posts, the speed and ease of using a quality post crete product often provides better overall value.
Can I use post-crete for a decking post?
Yes, post-mix is an excellent choice for securing the timber support posts for a garden deck. Its rapid-setting quality is a major benefit, allowing you to construct your deck’s subframe much faster than with traditional concrete. It provides a solid and durable foundation for standard decking carcassing. For exceptionally large or high-level decks with significant structural loads, you should consult your project plans to confirm strength requirements are met.
Do I need to mix post-crete before pouring it in the hole?
No, you should never pre-mix post crete. Its main advantage is that it is formulated for a simple, in-hole process. The correct method is to position the post, pour the dry powder from the bag into the hole around it, and then add the specified amount of water. The chemical reaction happens within the hole. Attempting to mix it beforehand in a bucket or mixer will cause it to set far too quickly to be usable.